
What's the problem I try to fix here?
Repetition. Boredom. Efficiency. Spend time creating new code instead of settings and configuration to start a project.
What's the experiment?
I wanted to create a template to kickstart some of the most common stacks I use when starting a new project.
At the same time, I wanted to try to put together a few technologies I'm interested in, such as Ansible,Terraform, and Packer and create a simple use case that makes sense.
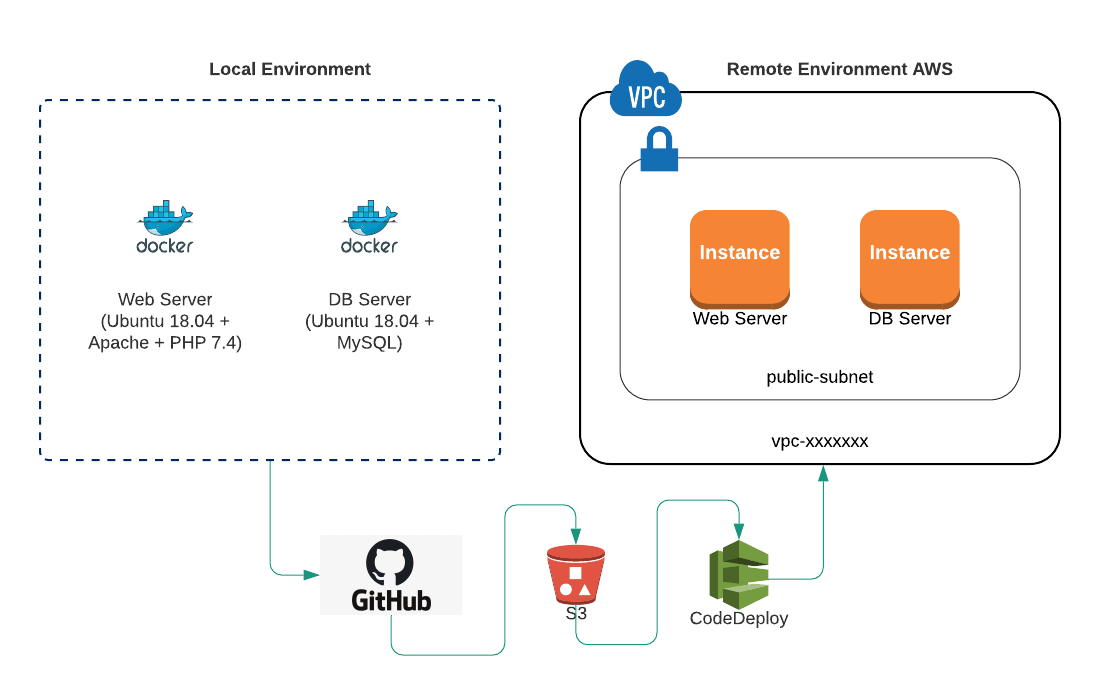
This project provides a template where you get the needed components to provision:
| Feature | Description |
|---|---|
| Local Environment | A local development environment for your Symfony 5 application using a two-tier architecture (webserver + DB). |
| Remote Environment | A remote environment on the AWS Cloud with exactly the same configuration. |
| CI/CD | A pre-configured CI/CD environment for Github + EC2 through CodeDeploy. |
The Symfony Kickstart Project Template
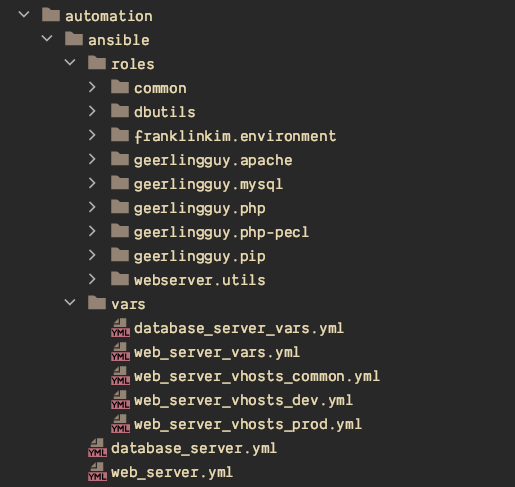
You will find the template in my GitHub project repository so you could hit the "Use this template" button and try the project in your repository and the local environment. Once you are there, you'll see the following folder structure:
Most of the content is standard Symfony 5.0 structure, generated by the Symfony "create project" command. The added value (at least what I think it adds value) is in the following folders:
- automation/ansible
- automation/packer
- automation/terraform
- build-scripts
- .github
In this blog post, I'll try to explain the details of what I've built with some level of detail. If you feel anxious in TL;DR mode and just want to get things done, you could jump directly to the project repository. In the README file, you'll get the basic instructions to make it work.
Lets start creating your local environment.
automation/packer
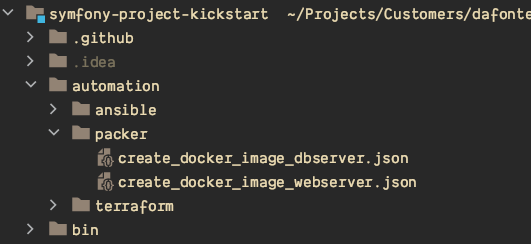
Here you'll find the JSON files needed to create the docker images comprising the local development environment.
- create_docker_image_webserver.json: Uses the web_server Ansible playbook to create a new docker image ([detailed contents](#detailed-contents)).
- create_docker_image_dbserver.json: Uses the database_server Ansible playbook to create our second docker image ([detailed contents](#detailed-contents)).
To create the images, you have to open the terminal, go to theautomation/packer folder, and run these commands:
# To build the webserver image:
packer build create_docker_image_webserver.json

# To build the database server image:
packer build create_docker_image_dbserver.json
Packer will find your Ansible playbooks, create an image based on Ubuntu 18.04, and install all the dependencies.
Well, now your images are created so the only thing you need to do is to use the docker-compose.yml file (included in the root folder of the project) to kickstart your environment. Go to the root folder and use the following commands:
# To create all the containers the first time:
docker-compose -d up

# For subsequent times,
# Start the containers with:
docker-compose start

# Stop them with:
docker-compose stop
As the webserver image mounts your root folder (the public folder more precisely) and maps the ports to your host machine, you should be able to access "http://localhost" and "https://localhost" (with a self-signed certificate) and see the example controller from your Symfony application. That's it. Feel free to customize the ports and any other configuration in the same "docker-compose.yml"
You'll probably be thinking: well, if you use the official images in the docker-compose you can save half of the effort so far. My answer will be "yes" and "no". For a quick start without caring too much about what's inside your environment, not needing specific libraries in PHP, etc... yes.
That is not the goal of this project. Something that bothers me (a lot) is to have differences between my local environment and others (production, testing, you name it).
- Building my own images allows me to assure what's inside.
- Even more, allows me to apply exactly the same Ansible playbooks to other environments.
Building the "other" environment
I'm a bit hesitant to call it a "production" environment because what I was looking for is an environment that is accessible from outside and could, potentially, be enabled 24/7. Using the "production" term here will imply that I'm covering high availability, security, performance, and other concerns that are out of the scope of the project (although you could easily extend the code to get there).
I just wanted to have a way to reproduce the local environment, in the cloud, making it available for the outside world without caring too much but still having something more or less reliable.
automation/terraform
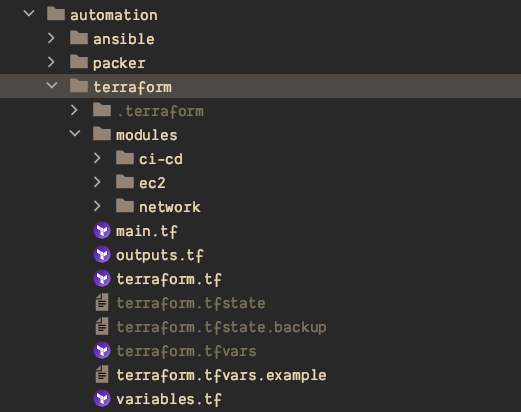
So, now you want to go one step further and create this second environment "live". Just move to the automation/terraform folder in your project, and you'll get there with few commands:
# Copy the terraform.tfvars.example and make it your own:
cp terraform.tfvars.example terraform.tfvars
This is the file where you can configure the needed information to create a duplicate of your local environment in the cloud, in this case, AWS Cloud.
# AWS usage and connection related configuration
aws_profile = "my_aws_profile_name"
region      = "eu-west-1"
public_key  = "~/.ssh/my_ssh_key_to_connect_to_aws.pub"
private_key = "~/.ssh/my_ssh_key_to_connect_to_aws.pem"

# EC2 base configuration. So far using ubuntu 18.04 in eu-west-1 (Ireland)
ec2_size         = "t2.micro"
amis             = {
    "eu-west-1" = "ami-089cc16f7f08c4457"
}

    # User to connect to EC2, usually ubuntu in ubuntu distributions or ec2-user in Amazon AMI.
ansible_user     = "ubuntu"

# This is for CI/CD. It will create an application with the name you define in CodeDeploy.
application_name = "myApplication"

# Networking configuration
cidr_vpc             = "10.1.0.0/16"
cidr_subnet          = "10.1.0.0/24"
webserver_private_ip = "10.1.0.10"
dbserver_private_ip  = "10.1.0.20"

# S3 bucket name for continuous integration (used by CodeDeploy to transfer files from Github)
deployment_s3_bucket = "some-unique-bucket-for-you"
Once you have all your variables configured, go ahead and kickstart the provisioning with the following terraform commands:
    # To initialize the terraform providers and the needed file structure the first time (or any time you change providers, modules, etc.):
    terraform init

    # To see what's going to happen if you run it (but not changing anything yet):
    terraform plan

    # If it looks good, apply:
    terraform apply
As part of the creation of the needed pipelines, network, security groups, and so on, the script will provision the EC2 machines using the same Ansible playbooks you applied to your docker local environment. That means that at the end of the execution you'll get, without doubts, exactly the same environment in both cases.
After successful execution, terraform will be so kind as to tell you what happened and where do you find your new infrastructure. This is configured in the outputs.tf file and it will tell you:
| Key name | Description |
|---|---|
| public_ip_webserver | your public IP where you access the Symfony application (the webserver IP) |
| webserver_private_ip | the private IP of your webserver |
| dbserver_private_ip | the private IP of your DB server (make sure you use that one in your database configuration for production) |
| s3_bucket_for_github_configuration | your newly created bucket for CI/CD. Youll need it to configure the deployment in Github in the last step of this blog post |
Alright, hopefully, everything went according to plan and now you have your local environment up and running so you can create your new big idea.
Even more, you have a cloud environment completely functional so you can put your new creation out there for the world to see.
Only one thing missing, CI/CD is already pre-configured but there are a couple of things we need to do. Let's check it out in the last section.
The glue. Putting the code automatically where is supposed to be (CI/CD)
Github actions ♥️ AWS CodeDeploy
Included with the terraform scripts you applied to create the AWS infrastructure, there are included a few extra things to enable continuous integration in the system. Basically, a CodeDeploy application has been created, a deployment group (with your new ec2 web server in it), and an S3 bucket to host the code as an intermediate step between Github, and your EC2 instance.
There is a Github deploy already configured for you in the project. The only thing you need is to create some secrets in your repo settings:
AWS_ACCESS_KEY_ID (access key of the user you want to use to deploy the code)
AWS_SECRET_ACCESS_KEY (secret key for that user)
AWS_REGION (region you are using in AWSI)
APPLICATION_NAME (the same you have configured in terraform.tfvars)
AWS_S3_DEPLOYMENT_BUCKET (the same you have configured in terraform.tfvars)
Make sure your AWS user have S3 and CodeDeploy permissions assigned in IAM (If you don't know what I'm talking about, you can always use an IAM user created with AmazonS3FullAccess and AWSCodeDeployFullAccess policies and ready to go)
Finally, in your project, you'll see the .github folder and a yml file where you can decide if you want to deploy clicking a button or after every commit. Just use on: workflow_dispatch or on: push.
# Make sure to configure the secrets in your repository before running this
# action:
#
# AWS_ACCESS_KEY_ID
# AWS_SECRET_ACCESS_KEY
# AWS_REGION
# APPLICATION_NAME (the same you've configured in terraform.tfvars)
# AWS_S3_DEPLOYMENT_BUCKET (the same you've configured in terraform.tfvars)
#
###############################################################################
name: CI/CD
# Change workflow_dispatch for push if you want continuous deployment
# on: [push, workflow_dispatch]
on: workflow_dispatch
jobs:
  production-deploy:
    runs-on: ubuntu-latest
    if: github.ref == 'refs/heads/master'
    steps:
      - uses: actions/checkout@v2
      - name: AWS Deploy push
        uses: ItsKarma/aws-cli@v1.70.0
        env:
            AWS_ACCESS_KEY_ID: ${{ secrets.AWS_ACCESS_KEY_ID }}
            AWS_SECRET_ACCESS_KEY: ${{ secrets.AWS_SECRET_ACCESS_KEY }}
            AWS_DEFAULT_REGION: ${{ secrets.AWS_REGION }}
        with:
            args: >-
                deploy push
                --application-name "symfony_project_kickstart_${{ secrets.APPLICATION_NAME }}"
                --description "New automatic deployment for ${{ secrets.APPLICATION_NAME }}"
                --s3-location s3://${{ secrets.AWS_S3_DEPLOYMENT_BUCKET }}/production.zip
                --source .
      - name: AWS Create Deploy
        uses: ItsKarma/aws-cli@v1.70.0
        env:
            AWS_ACCESS_KEY_ID: ${{ secrets.AWS_ACCESS_KEY_ID }}
            AWS_SECRET_ACCESS_KEY: ${{ secrets.AWS_SECRET_ACCESS_KEY }}
            AWS_DEFAULT_REGION: ${{ secrets.AWS_REGION }}
            with:
                  args: >-
                    deploy create-deployment
                    --application-name "symfony_project_kickstart_${{ secrets.APPLICATION_NAME }}"
                    --deployment-config-name CodeDeployDefault.OneAtATime
                    --deployment-group-name SPK_Deployment_Group_Webservers
                    --file-exists-behavior OVERWRITE
                    --s3-location bucket=${{ secrets.AWS_S3_DEPLOYMENT_BUCKET }},key=production.zip,bundleType=zip
My preferred way is both, so I can always run it manually but at the same time, its deployed with every commit on: [push, workflow_dispatch]
The composition of the Github Action is pretty straightforward:
- Checking out the code.
- Packing everything in a zip file to send it to the S3 bucket.
- Creating a CodeDeploy deployment telling the service where to find the files and what application to use. In the application AWS CodeDeploy saves the configuration about what server it should use to put the code into, as well as what type of deployment you want to use.
Here you should add more steps if it makes sense in your experiment (as unit test execution, validation, etc...)
For the last step of the deployment, feel free to modify the scripts you'll find in the build-scripts folder.
These are controlled by CodeDeploy and hooked into the process. I've included a couple of them as examples, but you can customize them or even add more steps.
Addendum: Ansible Contents
Just in case you want to have a quick overview of what's in your new servers, here's a detailed list. Of course, this is a starting point, you should customize it with new packages based on the reality of your project. Hopefully, they are a good starting point.
| Server | Description |
|---|---|
| Common for both | Tools and utility packages for general use (NTP, git, curl, wget, vim, awscli, and some python libraries) |
| Web Server | composer, nodejs, npm, ruby, software-properties-common, ca-certificates, python3-pip, apache, php7.4, the configuration of basic apache vhosts and self-signed certificates, as well as CodeDeploy agent |
| DB Server | MySQL Server and client, creating a database called "experiment" with an example user you can use out of the box: username: experiment, password: experiment |
Next ideas to implement
Some things I have in mind improving to extend this template
- Add an optional subdomain name enabler for the EC2 web server. If you have some domain hosted in route53, it will be pretty easy to create a subdomain, pointing it to your elastic IP and even create a let's encrypt certificate for SSL.
- Find a way to centralize the configuration. Now there is some configuration in terraform.tfvars, some other stuff in the GitHub ci/cd piece, some other in ansible. It would be nice to have some command-line script to ask you a few things and generate all the stuff.
- Maybe create some more stacks ... (I'm thinking python/Django stack for the next one)
Final thoughts
I hope you could find it useful. I learned a lot from building it. The biggest time investment has been in trying to create the pipelines. Having ansible talking to terraform and packer, finding the right place and the right configuration.
I'm not an expert in any of these technologies (more like a self-learner with some experience) so feel free to send me your feedback👇 and comments if you like the project or you think that the goal could be achieved differently. Always happy to learn.
Thanks for reading!